Node Management Process:
[ General Description | detailed design ]
Testbed assign nodes to individual experiments and is able to regain control whenever the node is rebooted and the server will refresh the image of the nodes if necessary. Also, when new node is added in this Testbed, several imaging and rebooting process is defined to accept the node to Testbed.
For a normal reboot, the node also boots up via PXE. PXE contacts the dchpd on boss, which gives it an IP address and so forth, and then hands it off to 'proxydhcpd'. This daemon looks into the nodes table, at the pxe_boot_path and next_pxe_boot path fields, to tell the card where to load its boot program from. This time the bootloader is pxeboot. PXE on the NIC then downloads the boot program pxeboot via TFTP from boss.
pxeboot contacts another daemon on boss called 'bootinfo' to find out what to boot. bootinfo looks at the nodes table to figure this out. Usually, this is done by looking at the 'def_boot_osid' field, then looking in the partitions table to discover which partition that OS can be found in. However, pxeboot can also boot from other sources, such as kernels loaded via TFTP based on the instruction from BOSS. This feature is given although it is not useful. You can also use pxeboot interactively, by pressing any key when prompted to do so during boot.
When the OS booted is the standard FreeBSD or Linux installation, /etc/testbed/rc.testbed is called to perform Emulab-specific configuration. First, the nodes contact cvsup on BOSS to look for incremental updates (this is done so that it doesn’t have to create a new image every time a single file is updated.) Next, for self-configuration, the Testbed Master Control Client (TMCC) on the node issues a series commands to the Testbed Master Control Daemon (TMCD) on BOSS (udp port 7777). The response of this “string” commands are “string” responses which contain configuration information for the nodes, including : network interface configurations, user and group information corresponding to the project members running the experiment and list of nfs mounts to be made. More information on this can be found at: http://www.emulab.net/doc/docwrapper.php3?docname=tmcd.html
Then the test nodes run scripts that set up things like routes, delay pipes, accounts, NFS mounts, etc. Most of this information is obtained from tmcd on boss.
This process takes place when a new node is added to the testbed.
- Node comes up and requests IP address from DHCP server.
- Node sends a proxy dhcp request to obtain the pxe boot location.
- Node contacts tftp server to download the boot loader pxeboot.newnode
- This boot loader downloads the FreeBSD MFS from BOSS.
- Node reports to BOSS that it is up. See New Node Creation section (Section 9) for more details about database updates at BOSS.
|
File
name |
Type |
Location |
Usage |
|
newnodecheckin.php3 |
Php |
/usr/testbed/www |
|
|
newclient |
Perl |
/usr/testbed/libexec |
|
|
Freenode.php |
Php |
/usr/testbed/www |
|
|
Newnodes_list.php |
Php |
/usr/testbed/www |
|
|
nfree |
Perl |
/usr/testbed/bin |
|
|
Os_select |
Perl lib |
/usr/testbed/lib |
|
|
Os_load |
Perl lib |
/usr/testbed/lib |
|
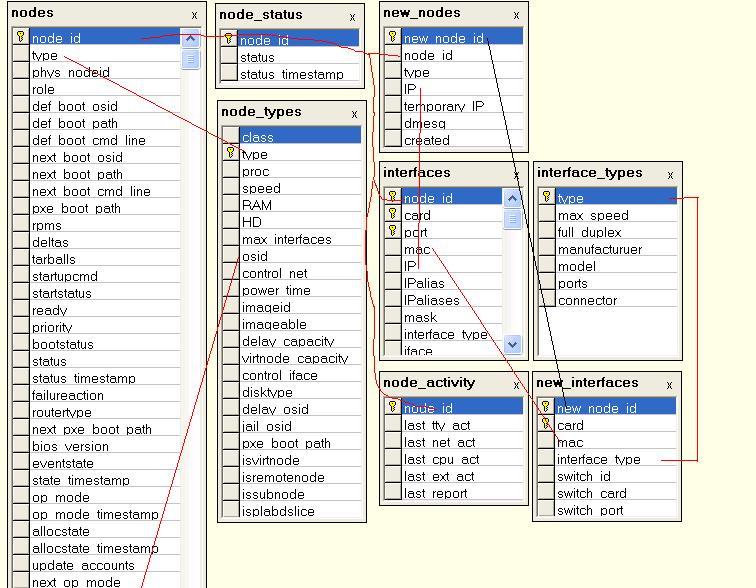
2.2 Related Database items:
|
Table name |
Major fields |
Usage |
Comments |
|
nodes |
|
|
|
|
interfaces |
|
|
|
|
New_interfaces |
|
|
|
|
Interface_types |
|
|
|
|
New_nodes |
|
|
|
|
Node_type |
|
|
|
|
os_info |
|
|
|
|
Scheduled_reloads |
|
|
|
3. Procedures.